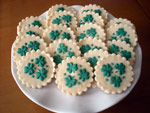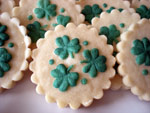
St. Patrick’s Day Cookies

Fun to make & tasty too, these Shamrock Shortbread Cookies are sure to bring you good luck and brighten your St. Patty’s Day!
To make the Shamrock Cookies you will need the following:
~ Shamrock Cookie Stamp
~ Scalloped Cutter Set or 2 ¼” Round or Scalloped Cutter
~ Emerald Green Luster Dust
~ Lemon Juice
Tools needed for this project are as follows –
~ Rolling Pin for rolling the dough
~ Small Paint Brush
~ Cookie Sheet
~ 8” Angled Icing Spatula or other lifting tool
~ Small Dish for mixing Luster Dust and lemon juice
~ Toothpicks

Step 1 – Begin by making the cookie dough. I used the Shortbread Recipe that comes with the Rycraft Cookie Stamp. This is a very simple shortbread recipe (I substituted superfine sugar for plain sugar) but you could use any kind or dough that is meant to be rolled and cut. The shortbread may seem a bit crumbly in the bowl, but you should be able to press it together with your hands to get it to form a ball.

Step 2 – Roll out the dough on a lightly floured surface or piece of parchment paper dusted with flour. Roll the dough to about ¼” thick. The surface of the dough doesn’t need to be perfectly smooth or unblemished because you are going to use the cookie stamp to make an impression that will cover imperfections.

Step 3 – Now that the dough is rolled out it’s time to stamp the cookies. To prevent the cookie dough from sticking to the stamp you can dust the stamp with a bit of flour. Make sure to tap all of the flour out of the stamp or use a toothpick to get flour out of the stamp. If the stamp is clogged with flour, you will not get a clean impression. Now stamp as many Shamrocks as you can on the dough you have rolled out approximately 2 ½” apart (center to center). This will ensure that you have enough space to cut them out with your round or scalloped cutter.
Step 4 – Cut the cookies out using a 2 ¼” Scalloped or Round Cutter.

Step 5 – Remove excess dough from around the cookies.

Step 6 – Using an angled spatula lift the cookies onto your cookie sheet. If you are not using a Silpat or nonstick cookie sheet, bake the cookies on a sheet of parchment paper so they won’t stick.

Step 7 – Once your cookie sheet is filled put the cookie sheet in the refrigerator for 20 minutes. This will help the shamrock design to come out more crisply and will minimize puffing. Turn the oven to the temperature indicated on the recipe.
Step 8 – Now it’s time to bake the cookies. Pull the cookie sheet directly out of the refrigerator and place in the oven. Bake as per the recipe. I baked these cookies for about 12 minutes.
Step 9 – Remove cookies from the oven and let cool. Move to a cooling rack.

Step 10 – Once the cookies are completely cool, it is time to decorate! This is my favorite part! Begin by mixing together the luster dust and lemon juice. The lemon juice is used because it is clear and will help to make a paint out of the luster dust. You could try other clear liquids. Clear vanilla and vodka work as well. Mix the luster dust and lemon juice to the desired consistency. I wanted the emerald green to be a vibrant and saturated with color, so I used very little lemon juice to luster dust. Try 1/8 tsp luster dust per 1 drop of lemon juice. From there you can add more of either depending on what shade you want. Use a small paint brush to mix the luster dust and liquid.
Step 11 – Paint the Luster Dust paint you have just created onto the cookies. Make more paint as needed. If the mixture dries out, add more lemon juice.

Step 12 – Let the cookies dry for a couple of hours before stacking so that the paint will have set up.
Now you have beautiful St. Patty’s Day treats to share. I love the look of the shimmery green luster dust paint that decorates these cookies. These cookies will last for a long time (at least two weeks) when stored in an airtight container.
Enjoy!